Another Week, Another Whim

Here we go into a new whim week and I’ve pulled a nice leafy print from my fabric stash to make a dress for my daughter Anna. This piece of polyester georgette was a relatively recent acquisition: I remember picking it up some time in the last few years.  I probably paid $2.00/yard or less for this 3 yard piece. I tend to justify my fabric addiction by shopping the clearance fabrics and paying less for a potential dress than some people pay for a large coffee.

It’s the potential part of the purchase that gets snagged up. I imagine a dress or a skirt or a blouse or a jacket, buy the needed yardage on sale, and bring home my find-of-the-day with the plan to make up that imagined design soon. “Soon” passes by and then I consider the fabric as inventory, a positive asset in the ongoing business of making classic fashion one custom design at a time. And then I need therapy for my fabric addition and here we are, in week 9 of therapy, otherwise described as a Whim a Week.

Whim 9 Idea Board

Whim 9 Idea Board

Whim 9 is pretty straight forward. I’m using New Look 6022 with a minor adjustment to the line of the skirt. I made up this pattern for my daughter Anna to wear to a friend’s wedding a little over a year ago. She loves the dress and wears it often, so another please. She always wants pockets, so we’ll add those in the side seams as well. One side of the fabric is a lighter version of the reverse side, and I plan to use these differences as a design feature, with banding at neck edge and belt in the darker side, the rest of the dress in lighter side of fabric.

The dress pulls on over the head and requires a single button closure at back neck. I pulled a light and a dark button out from my button box and will decide which to use when the time comes. The sleeve has an elasticized accent and I have more than enough elastic in my notions drawer to meet the need, and so keeping to the goal to whim with what I have on hand.

Another week, another whim, and we’re off!

Whim 8 Reveal

Whim 8 whipped up in so little time I’m a little sad I waited so long to make it. But I am not a bit sad about the wearable results! I wore Whim 8 for a gig this past weekend and both the fit and the look were just right.

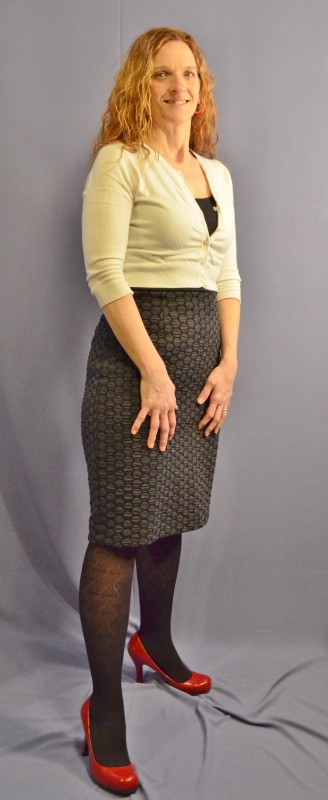
Black with gray dot knit pencil skirt

Front view Whim 8

I’m a singer/songwriter as well as a couturier. I have a new cd of 10 original songs releasing next month, and we did a little pre-release show this past Saturday for the women’s meeting at Zarephath Christian Church in central New Jersey. I wore Whim 8. I felt comfortable and attractive. When you take the stage in front of a group of women, its good to be happy about what your’e wearing. In a perfect world, I would wear a custom design of my own to every special event as a sort of calling card, so it was nice to be ina perfect world for a few hours this past weekend.

Black with gray dot knit pencil skirt worn by singer/songwriter Cindy Endres

Whim 8 as worn by singer/songwriter Cindy Endres

Lets talk a little about this skirt. The front and the back are the same, with two darts for fit and an elastic waistband. It took a scant 27 inches of yardage, and excluding pattern drafting time, less than an hour to make. You can dress this style up with heals, wear it with flats, or just pull it on in the summer as an attractive and cool alternative to shorts. I will be making more!

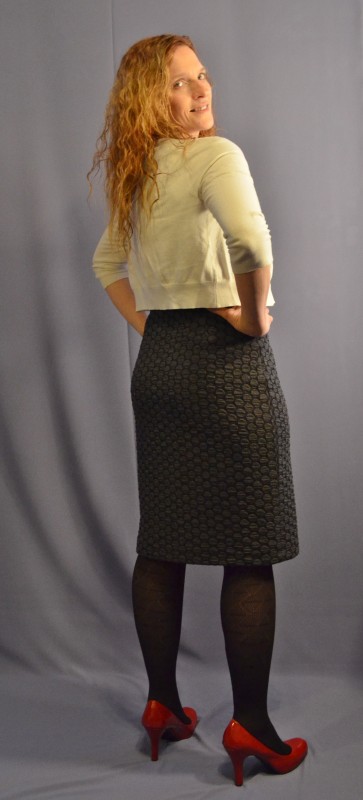
Black with gray dot knit pencil skirt

Whim 8 back view

One evidence of proper fit in a straight skirt is a side seam that hangs perpendicular to the floor. This takes different adjustments for different figures. I have a slight sway back, which means the waistline of any ready made skirt dips down at the back waist, causing the side seams to slant toward the front at the hem. Knowing this, I drafted the waist line a quarter inch lower at center back, tapering to no change at side seams, and then cut out the fabric. Side seams go up and down. Nice!

Black with gray dot knit pencil skirt

Whim 8 side view

This dotted knit of Whim 8 is heavier than tee-shirt weight, and holds its own without feeling stiff or confining. Did you know the average woman’s hips expand 3 inches when seated? Woven fabrics have to allow for this expansion with what is called “wearing ease”. Knits allow for a little less ease because they expand with us (yuck… expanding hips are yuck!). I actually took in the skirt at the sides after first fitting, so I’m happy about it all over again.

Black with gray dot knit pencil skirt

Whim 8 moves with me!

I’m done with Whim 8 and pretty sure Whim 9 is going to be a dress for a certain daughter who asked for it (Anna). Wednesday is new whim day, so check back to see where I’m whimming next! Eliana and I will be in the sewing studio all day.

Setting up photo shoot with Eliana

Setting up photo shoot with Eliana

My music will be available for purchase and download in March, and you can follow along with the pre-release promotional process at my other blog: cindyendres.wordpress.com.

Whim 8 Design

Whim 8 is a simple project, but who cares how complicated it is? I could sew to show off, but not this week. I’ve been imagining this little piece of dotted knit as a skirt for too long, maybe more than six years. My oldest daughter Elizabeth was in college and making money on the side doing alterations.  If memory serves, her power of fabric magnetism was working in full force, and this piece of yardage was in a larger acquisition from one of her clients. Add some elastic from my notions drawer and I’m whimming this week with some cast off cast-off polka dots. So good. Fashion for nothing but a little but of time. I love it.

Knit pencil skirt in gray on black dots

Whim 8 Idea Board

This project should make up quickly, so I can make a few more reusable shopping bags and finish up the tutorial to go with them (Whim 6).

Knit pencil skirt in gray on black dots

Whim 8 dot size

Whim 7 Fitting Step by Step

If you’ve been following along with Whim 7, you already know my story about fighting the frump with this design. Proper fit is a big deal in the overall impression a garment presents. Here’s the step by step.

The overall fit was too long in bodice and a little too loose. The first step was to separate the skirt from the bodice and I am so glad I tried on the dress before over-locking the waist seam to finish.

Short sleeved dress with contrast collar in vintage plaid knit

Ripping waist seam to make fit adjustments

The bodice needed to be 1.25 inches shorter. I cut with my rotary cutter, measuring up from raw edge. It only looks scary if you don’t regularly do this. (I think surgery looks scary but not so to a doctor!)

Short sleeved dress with contrast collar in vintage plaid knit

Cutting off unwanted length at bodice bottom (waist seam)

The bodice was too boxy at waist, so I took in at sides. This photo shows the first adjustment. I tried on bodice for fit again and then took in another little bit at sides for overall adjustment of minus 3 inches. The trick was to not loose continuity with the fit of the underarm, sleeves and shoulders. As the skirt is gathered on, I didn’t need to worry about fit adjustments on skirt. Change in waist circumference will be accommodated by skirt gathers.

Short sleeved dress with contrast collar in vintage plaid knit

Adjustment at bodice sides for closer fit

The back neck edge was a little big, so while it was all apart, I made adjustment there. I have broad shoulders, a little less sloped than average, and this is a common adjustment for me. The angle of my shoulders creates a little extra dip in the back neck curve that can be refitted by taking a deeper seam toward upper edge of back. If the design calls for a center back fold, I have to make this adjustment before cutting. Most of my patterns for myself are altered here from the beginning. Most. This is another adjustment made on the pattern for this dress for future use.

Short sleeved dress with contrast collar in vintage plaid knit

Adjusting fit at center back

I decided to add elastic along the bottom of the bodice before attaching the skirt again, to keep waistline from looking too baggy. This knit has a lot of stretch and no spandex for recovery. Retro fabrics could only dream of spandex!

Short sleeved dress with contrast collar in vintage plaid knit

Elastic added at waist seam for stability

That was it for adjustments. I put the skirt back on and hemmed it. A shorter hem might fight against the frump as well, but you really don’t want to see my knees. Skirts cover a multitude of sins.

Whim 7 belt flats

Tonight I’ll post my new Whim 8 idea board. I have a short list on my desk right now and just have to make my mind up. A-whimming I will go!

Whim 7 Fitted and Finished

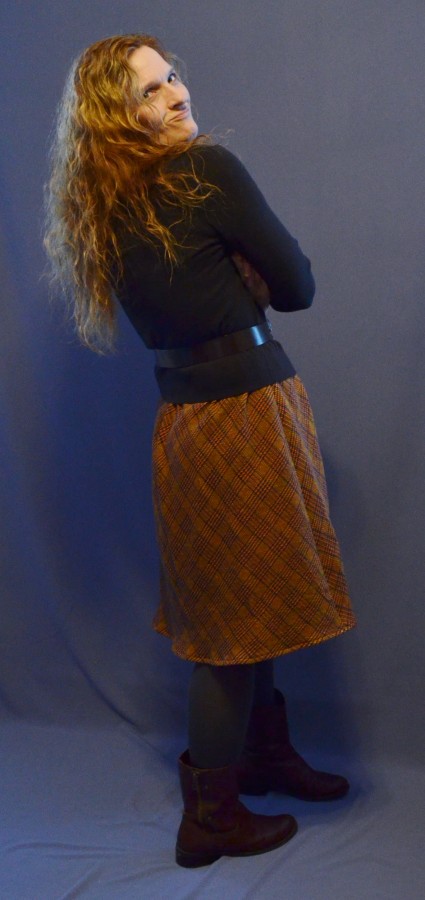
There’s a risk in using retro fabric: the risk is looking frumpy. I like what some people might call “old lady prints” but I don’t want to look like an old lady. (You can grow old gracefully or you can fight it every step of the way. I’m doing the latter.) So when I tried on Whim 7 this morning, it was apparent I was standing on the edge of frump.

I don’t own a dress form. In my line of work, I should own several: one in my size and another two or three in common client sizes. But I don’t. If I had a dress form in my size, I would’ve pinned and fitted the dress as I went, before stitching. But alas! I had to alter. Not a problem. I do this for a living. I fitted the frump away!

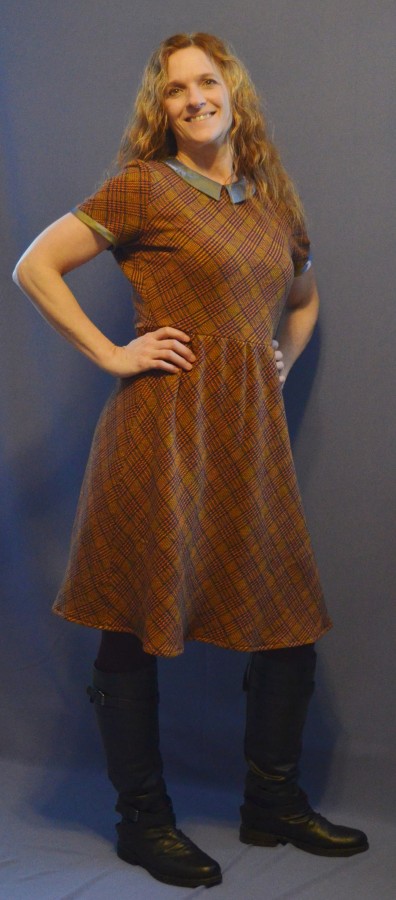
Short sleeved dress with contrast collar in vintage plaid knit

Whim 7 with tights and boots

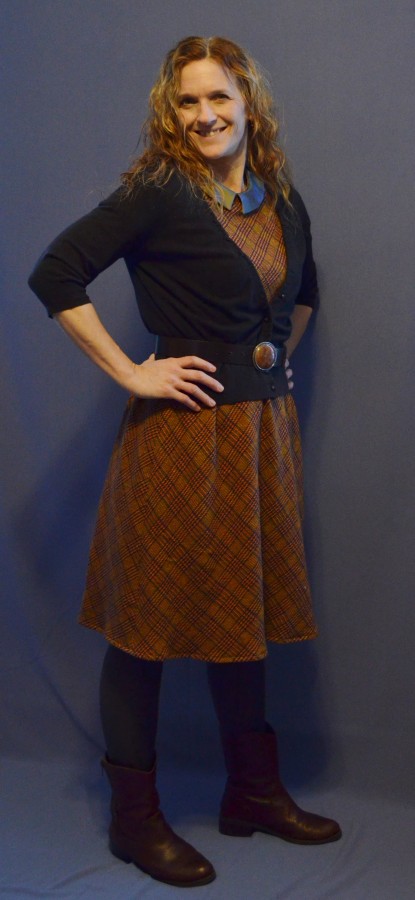
The final fit is satisfactory. I still need to tweak the pattern in case I use it again. But I’m happy with the fit and will wear this dress this week. This first styling is with tights and boots as I imagined when I drew design. I like the second styling better. It’s more my style.

Short sleeved dress with contrast collar in vintage plaid knit

Whim 7 Cindy Style

There were unforeseen obstacles in completing this Whim 7, challenges I didn’t expect when I posted my idea board last Wednesday.

Challenge 1: The fabric was skewed, apparently due to laundering. The bonding agent used to attach the original nylon tricot backing dissolved in the wash. I did not have a rectangle of yardage, but a parallelogram. This made cutting more difficult, and it made matching the pattern at center back bodice impossible.

Challenge 2: The yardage was not enough for the pattern I drafted as designed. My solution was to cut the collar in contrast fabric, the fabric originally intended for collar piping. The design detail of piping along the collar edge was eliminated.

Challenge 3: Fit. I just couldn’t leave the fit at frumpy. I’m at an age too close to real frump to allow a design to push me there. I tried the dress on this morning to mark the hem and I didn’t like the fit. I asked my daughter Anna for feedback. She agreed with the need to fight the frump factor. I then asked my daughter Isabella for feedback, and her answer was “I don’t have an opinion”. (Me) “You don’t like this fabric, do you?” (Belle) “I think its ugly”. I love her honesty! And ugly (say “retro”) fabric is why Whim 7 is for me and  not for Isabella!

Challenge 4: Which button to use? I’m actually kidding. Of all the decisions to make in finishing Whim 7, choice of button was really not a challenge. The vintage button begged to be used.  I simply said yes. Around the button is a thin loop of the dress fabric to close the back neck edge.


Short sleeved dress with contrast collar in vintage plaid knit

Vintage button for vintage knit dress!

All of the challenges were met as encountered, and I’ll share the “refit” of Whim 7, step by step, in a new post in the morning.

Short sleeved dress with contrast collar in vintage plaid knit

Back View Whim 7 Cindy Style


Whim 7 Dress Design

I’m a fabric magnet. Let someone find out I sew, and next thing you know, they’re stopping by a “few pieces I don’t really need”. As with most of us who struggle with an addiction, I mean to resist, but just don’t. You never know when you might find a good use for that new-to-you sassy piece of yardage!

Sometime in July 2012 I made a stop in nearby Nazareth, PA to pick up a craft table I found on Craigslist for a mere $20. This kind of transaction usually involves some polite chitchat, and when I revealed I was indeed using this table for sewing, a cardboard box filled with retro knits was thrust into my arms to take along home as well. Total cost: the shame of yielding to fabric temptation and zero cents.

The knits were nylon backed, and in need of a laundry refresh, so I put all the pieces through the washer and dryer. Without exception, the nylon backing came free from each piece of knit. No worries though, as knits all seemed intact without backing, which probably served to add stability.

Design for knit dress in retro plaid begins with fabric options

Retro fabrics, laundered and ready to sew

This week I’m going to make a casual dress to wear to an event coming up on Feb 22nd. I have a pair of knee high black boots that zip up the back with an exposed blue zipper and I think this dress will work with them.We shall see.

Design for knit dress in retro plaid

Whim 7 Idea

I plan to add contrast at the sleeve edge and piping along the collar edge, but I’m undecided whether to do it in blue chambray or iridescent purple/gold. I’m also undecided about which button to use at back neck opening, but I have options from my button can. I’ll choose according to my whim!

Design for knit dress in retro plaid

Whim 7 Sketch

We’re going to get hit with another huge snow storm, beginning tonight and continuing through Friday.  Earlier, I filled the fuel tank in our generator and did a gas station run for back-up fuel supply. If this storm takes out our power, I”ll start up the generator and just keep sewing.

Whim 6 Blue-bottom Reveal

The blue leather bottom of this bag is so beyond what I had imagined. The finished bag just looks too stunning for grocery shopping!

Reusable shopping bag with leather bottom and handles

Blue-bottom Stunningness!

I should not have waited so long to use this leather stash (acquired prior to 1999). Seems I am whimming my way through my historic fabric stash.

I plan to share in the near future the steps I took from start to finish on this project so you can make your own stunning shopping bag(s). My jumping off point for this whim was a pattern on the sew4home website (shopping bag pattern). Modifications were necessary for use of leather.  I also added boning along sides for upright support. I especially like the bottom stability provided by a simple sheath of fabric with a cardboard insert. Just remove cardboard before laundering or replace cardboard if it stops doing the job.

Reusable shopping bag with leather bottom and handles

Inside view of boning and bottom insert

Reusable shopping bag with leather bottom and handles

Shopping bag and inside bottom insert

I had the open time slot to post my finished whim just after dinner tonight, but I wanted to make another shopping bag. I jumped in with a green leather bottom and used the reverse side of the brown geo-plaid fabric above. I’ll put pictures up of my shopping bag collection as I continue to create it. The whole project worked up a lot quicker the second time, as I didn’t need to think about leather mods to the pattern, just repeat the process from bag 1. I’m happy to make this whim over and over. The results are so gratifying.

The grocery store requires your name on all of your reusable shopping bags, so I added it on the inside. No one is going to use a Sharpie on this bag! (Well, except me, on leather, neat handwriting, topstitching, yeah.) And I added my tag, Something New, because I can.

Reusable shopping bag with leather bottom and handles

Name label and woven label

Whim 7 idea board will be up tomorrow!